Prerequisites#
Before starting, make sure you have:
Windows PC Requirements: Ensure your PC has enough RAM, CPU, and disk space.
GNS3 and GNS3 VM: Download and install GNS3 and its VM from the website.
Follow the installation instructions.
Ubuntu 22 Server: Install Ubuntu 22 Server in VMware.
Helpful Video
Starting the Lab Environment#
Open GNS3 on your Windows PC and complete any setup wizards.
Ensure VMware is running, locate the GNS3 VM, verify the connection between GNS3 GUI and the virtual machine.
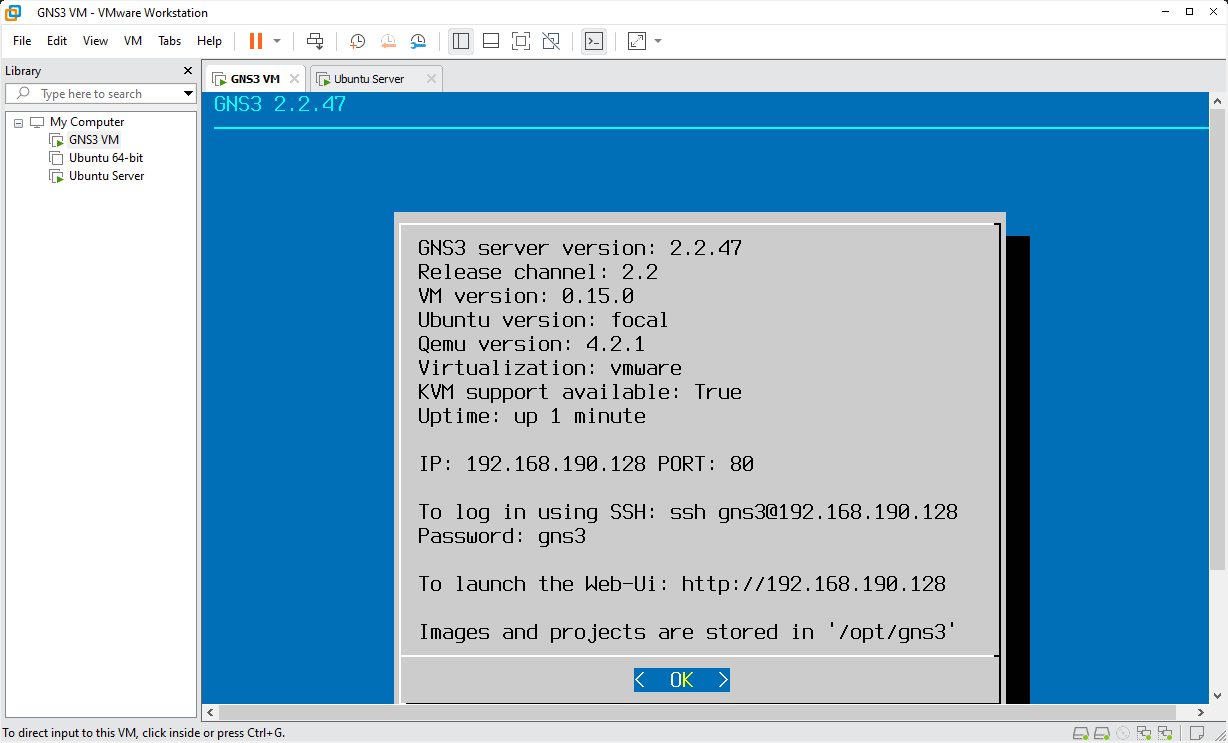
GNS3 VM#
Configuring Ubuntu Server#
Follow these steps to set up a second network adapter for Ubuntu Server in VMware:
Add Network Adapter#
Open VMware and locate the Ubuntu Server virtual machine.
Ensure the VM is powered off.
Right-click the VM and select “Settings.”
Navigate to the “Network Adapter” tab and add a second adapter.
Change the network connection mode to
Vmnet2.Click OK to save the changes.

Network Adopter#
Start Ubuntu Server#
Power on the Ubuntu Server virtual machine in VMware.
Log in using your credentials.
Verify Network Configuration#
Open a terminal in Ubuntu.
Configure static IP addresses on both network adapters by editing the netplan configuration:
sudo nano /etc/netplan/00-installer-config.yaml
Example netplan configuration:
# This is the network config written by 'subiquity'
network:
  ethernets:
    ens33:  # NAT Adapter
      addresses:
        - 192.168.71.100/24
      gateway4: 192.168.71.2
      nameservers:
        addresses:
          - 8.8.8.8
          - 8.8.4.4
    ens37:  # Vmnet2 Adapter
      addresses:
        - 172.16.10.10/24
  version: 2
Apply the netplan configuration:
sudo netplan apply
Check the network interfaces:
ip addr show
Make sure the network interfaces have IP addresses and are in the “UP” state.
Adding Cloud Node to GNS3#
Open GNS3 and go to your workspace.
Drag the Cloud node into the workspace.
Connect the cloud node to your devices.
Right-click the cloud node and select “Configure.”
Choose the network adapter that corresponds to your Ubuntu server network.
Click “OK” and save the project.
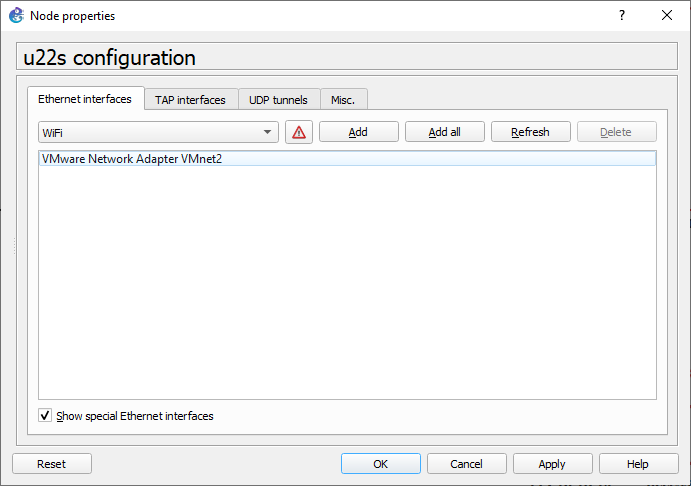
Cloud Node Setting#
Installing VSCode and SSH Extension#
Download and install VSCode from VSCode Downloads.
Open VSCode.
Go to Extensions (Ctrl+Shift+X) and search for “Remote - SSH.”
Install the “Remote - SSH” extension.

SSH Extension#
Configure SSH Connection#
Click on the blue square icon (Remote Explorer) in the bottom-left corner of VSCode.
Click “Connect to Host” and add your SSH details (username, IP address).
Connecting VSCode to Ubuntu Server#
Click on the SSH target representing your Ubuntu Server.
Enter the password when prompted.
Verify the connection by running basic commands in the VSCode terminal.
Create and Test Python Scripts#
Create a new Python file in VSCode.
Write a simple script (e.g., print(“Hello, GNS3!”)).
Run the script using the VSCode terminal.
Setting Up Network Devices in GNS3#
In this section, we’ll add network devices to our workspace and configure them according to the provided lab topology.
Lab Topology Overview#
Here’s the lab topology for this section:
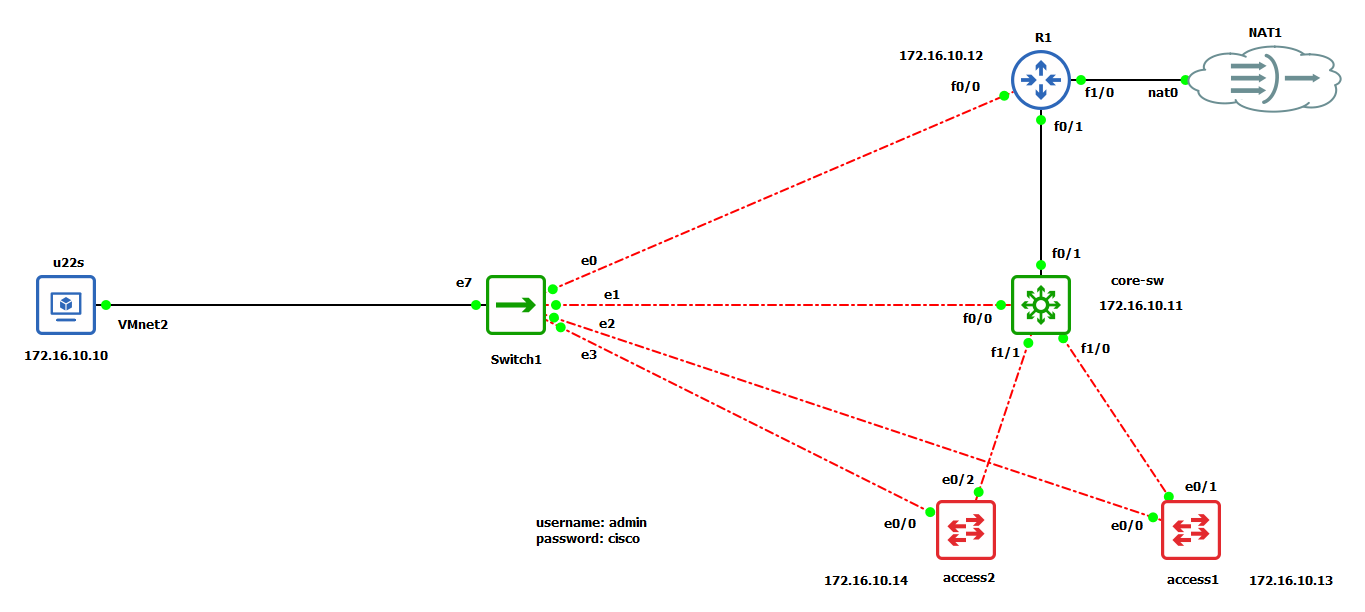
Lab Topology#
Adding and Connecting Devices#
Add a Built-in Switch:
Drag a built-in switch from the device list into your workspace.
Connect this switch to your Ubuntu machine.
Add Routers and Switches:
Add 2 routers and 2 switches to the workspace.
Connect the devices as shown in the lab topology image.
Configuring IP Addresses#
Assign the following IP addresses to the respective devices:
172.16.10.11172.16.10.12172.16.10.13172.16.10.14
Make sure each device has the correct IP address to match the topology.
Setting Up User Credentials#
Set up usernames and passwords on all network devices. Use consistent credentials for easier access and management.
Enabling SSH#
To manage the network devices remotely, we’ll set up SSH on each router and switch. Follow these steps:
Configure Domain and Generate RSA Keys:
ip domain-name lab.com
crypto key generate rsa
Enable SSH:
ip ssh version 2
Configure VTY Lines:
line vty 0 4
transport input ssh
login local
Set User Credentials:
username <your-username> privilege 15 secret <your-password>
We’ve now added network devices to our GNS3 workspace, connected them according to the lab topology, assigned IP addresses, set up user credentials, and enabled SSH access. This sets up the foundation for more advanced network simulations and automation tasks.
Establishing a Manual Connection#
Before running Ansible commands or playbooks, manually connect to the managed nodes via SSH to confirm your credentials and add the device’s RSA key fingerprint to your known hosts. For example, to connect to a router:
ssh admin@172.16.10.11
After entering your password, you can run a command like show ip int bri to check the device’s interfaces:
r1#sh ip int bri
Interface                  IP-Address      OK? Method Status                Protocol
FastEthernet0/0            172.16.10.11    YES NVRAM  up                    up
FastEthernet0/1            unassigned      YES NVRAM  administratively down down
FastEthernet1/0            unassigned      YES unset  administratively down down
r1#exit
Running Your First Ansible Command#
Instead of manually connecting to the device, you can retrieve its configuration with an Ansible command:
ansible all -i 172.16.10.12, -c network_cli -u admin -k -m ios_facts -e ansible_network_os=ios
This command:
Targets all hosts defined in the inventory (
-i 172.16.10.12,).Uses
network_clias the connection type (-c network_cli).Authenticates with the username
admin(-u admin).Prompts for a password (
-k).Executes the
ios_factsmodule to gather information about IOS devices (-m ios_facts).Specifies the network platform as
ios(-e ansible_network_os=ios).
The output will show facts about the device, confirming that Ansible can successfully gather information from it.
Key Parameters#
-i: Specifies the list of managed nodes.-c: Defines the connection type.-u: Specifies the username for authentication.-k: Prompts for a password.-m: Specifies the module name.-e: Defines additional variables, such as the network platform.
Ansible is a powerful tool for automating IT infrastructure management, including network automation with broad device and protocol support. Its installation process is straightforward, and its features for privilege escalation and network-specific tasks further enhance its utility.
Congratulations! You’ve successfully set up your virtual network lab with GNS3, Ubuntu Server, and VSCode. This lab will help you test Python code and improve your networking skills.